DBT / How-to
This post dives into the use of CI/CD for dbt Core, providing insights on dbt Cloud’s ‘Slim CI’ CICD job pattern and how to implement this using dbt Core. We’ll also touch on other common options available to enhance your dbt CI/CD pipelines.
Agenda
- Using CI/CD to Verify Your dbt Changes
- What is the dbt ’Slim CI’ Job Pattern?
- How to Recreate the ‘Slim CI’ Pattern in dbt Core
- Enhancing Your dbt CI/CD Pipeline
- Summary
- Useful Resources
1. Using CI/CD to Verify Your dbt Changes
In the context of dbt, CI/CD can be used to streamline the testing and deployment processes for files within your dbt project repo.
For instance, you can ensure the reliability and deployment readiness of your data transformations by triggering a CI/CD pipeline upon code changes, thereby automating the testing of your data models.
2. What is the dbt Cloud ‘Slim CI’ Job Pattern?
The ‘Slim CI’ job pattern, native to dbt Cloud, is designed to test only modified dbt models when a pull request is created in your dbt Git repository. This is described in detail here.
While it’s available in dbt Cloud, this pattern can also be implemented in dbt Core. To achieve this, you can leverage the dbt state:modified and defer functionality. These concepts allow dbt to identify and test only the models that have been changed. This is described further below.
What is dbt ‘State’ Processing?
We use the state:modified and deferflags to instruct our CI/CD pipeline to only run dbt models that have been modified since the last successful build. Here’s a simple example showing how the state:modified and defer flags can be used within a slim-ci job:
version: 2
jobs:
  dbt_slim_ci:
    docker:
      - image: your_dbt_image:latest
    steps:
      - checkout
      - run: dbt deps  # Install dependencies
      - run: |

          OUTPUT=$(dbt ls --selector state:modified+ --defer --state=prod-run-artifacts)  # Get a list of modified dbt models
          if [[ -n "$OUTPUT" ]]; then
            dbt run --models "$OUTPUT"  # Run dbt only on modified models
          else
            echo "No modified models found. Skipping dbt run."
          fi
In the above code block, we’ve used the dbt state:modified flag in combination with the ls command to list all modified dbt models. We can use the same idea to only run/test modified dbt models, for example, using commands similar to:
dbt run --select state:modified+ --defer --state=prod-run-artifactsHowever, the key detail that is missing in the above is how does dbt determine what models have been modified?
How Does dbt Know What Has Been Modified?
For dbt to understand the ‘state’ in the above code example, it needs to have access to two versions of the dbt manifest file (i.e., manifest.json):
- One used to describe the dbt project on the
main/masterbranch - Another to describe the dbt project on the incoming
featurebranch
Only if we have two versions of the manifest file can dbt make a comparison to understand/use state processing. Which begs the question, how/where should we put this second manifest file?
dbt ‘Defer’
As described here, the defer flag is commonly used in combination with state to "enable 'Slim CI'".
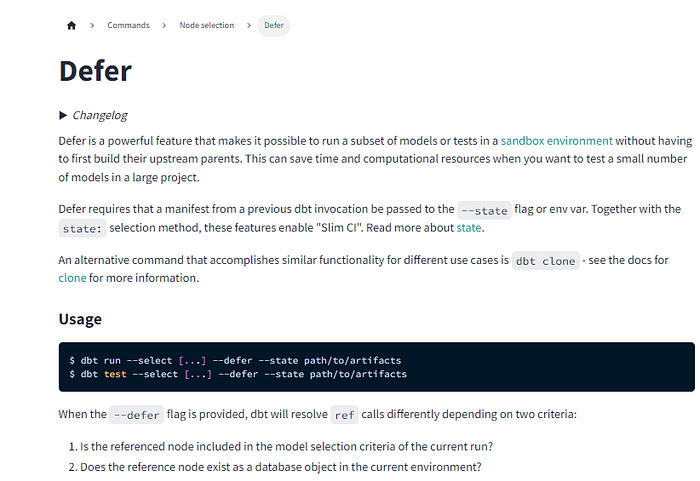
In the example in the above screenshot, the defer arg is used to point to/reference a second dbt manifest file. Where it uses this, in combination with the state flag, to understand what dbt models have changed — i.e., enable state processing!
3. How to Recreate the ‘Slim CI’ Pattern in dbt Core
This section provides a high-level, step-by-step guide to replicating the ‘Slim CI’ pattern in dbt Core using state processing:
Step 1: Generate dbt Manifests
To create the manifest for your main/master branch, you’ll need to run dbt compile. In addition, as mentioned on dbt's defer documentation, you'll need to specify an output location for these 'prod run artefacts' using the arg target-path. For example:
dbt compile --target-path=prod-run-artifactsdbt commonly gives the example directory name ‘prod-run-artefacts’, but you can use whatever name you wish.
Step 2 — Push dbt Manifest
We’ll need this manifest.json file to be available within our CI/CD job. As such, it makes sense to push (only) this manifest.json file to your Git main or master branch.
Step 3 — Generate Feature Branch Manifest
Within your CI/CD job, we’ll need to generate a manifest file for your feature branch as a basis for comparison. For example:
version: 2
jobs:
  dbt_slim_ci:
    docker:
      - image: your_dbt_image:latest
    steps:
      - checkout

      - run: |
          dbt compile  # Run dbt only on modified models
Note: in the dbt compile command used within the CI/CD job, we don't use the --target-path= arg. That's only used for the main/master branch.
Step 4 — Applying ‘State Processing’
Continuing on from the above CI/CD code, we then use the defer and state flags to determine what models have been modified:
version: 2
jobs:
  dbt_slim_ci:
    docker:
      - image: your_dbt_image:latest
    steps:
      - checkout  # on our feature branch

      - run: |

        dbt compile  # compile our feature branch changes

        dbt ls --select state:modified+ --defer --state=prod-run-artifacts  # list the modified dbt models

        dbt run --select state:modified+ --defer --state=prod-run-artifacts  # run modified dbt models only
The above code is just a simple example, but you can see why/how two versions of the dbt manifest file are needed for dbt’ state processing’.
Establishing a dbt ‘slim CI’ job provides an excellent foundation for implementing further CI/CD checks against your dbt project since you’re targeting only modified dbt models to test…rather than an entire dbt project.
4. Enhancing Your dbt CI/CD Pipeline
I recommend first implementing this dbt’ slim CI’ pattern as the first/foundation of your CI/CD job. Once you have this in place, there are several great next-candidate tests to add. I’ve tried to loosely list these in order of complexity/effort to implement:
Candidate 1: SQLFluff
- A very common approach, it’s even listed as an example in dbt’s CI documentation.
- As described in SQLFluff’s online documentation, to use SQLFluff within CI/CD, you need to use the
diff-qualitycommand.
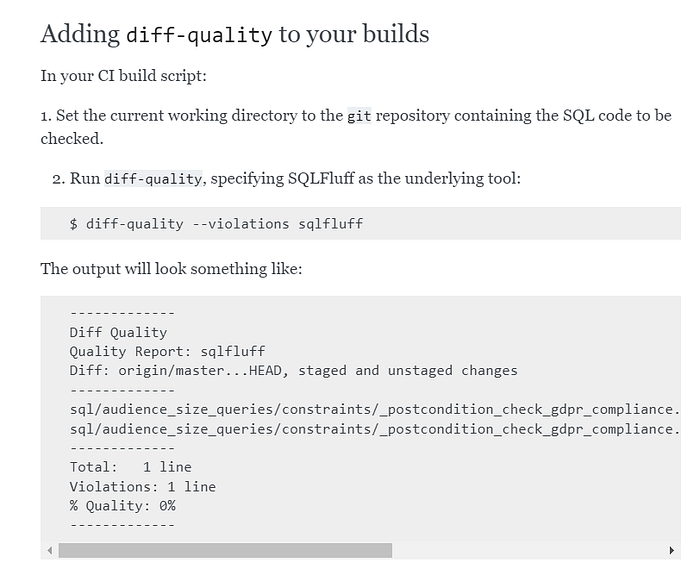
For example:
$ diff-quality --violations sqlfluff --compare-branch origin/master --fail-under 100Using diff-quality ensures that SQLFluff lint is only performed on modified dbt models (like Slim CI above).
Warning: If you’re not currently using SQLFluff, use this with caution
If SQLFluff isn’t currently used within your team… you’ll need to uplift your existing SQL code to comply with SQLFluff. Otherwise, any SQLFluff linting performed within a CI/CD job will identify SQL linting issues with existing/legacy code.
Candidate 2: Git Standards Enforcement
Very trivial one (and little effort), I recommend using CI/CD to validate your Git standards. For example, I use CI/CD to validate the Git branch names to ensure it follows our naming conventions. For example:
# the regex for valid git branch names (i.e., snake_case)
VALID_GIT_BRANCH_NAME="^(feature|hotfix|release)\/[a-z0-9_]+$"

# Validate the Git branch name used
if [[ ! $SOURCE_GIT_BRANCH_NAME =~ $VALID_GIT_BRANCH_NAME ]]
then
    echo
    echo -e "${RED}#############################################################################################"
    echo -e "${RED}# ERROR: Invalid Git branch name."
    echo -e "${RED}#############################################################################################${COLOUR_OFF}"
    echo -e "Local git branch name = $SOURCE_GIT_BRANCH_NAME"

...

fi
This isn’t the complete code used, but it gives a flavour of what it’s doing.
Candidate 3 (High-Value): dbt-checkpoint
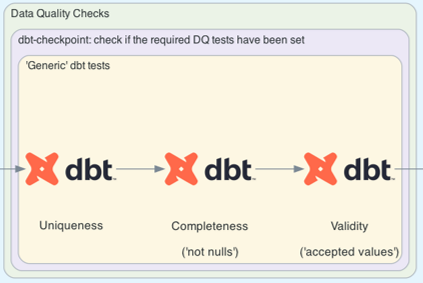
I strongly recommend using this. dbt-checkpoint provides a variety of pre-commit hooks that can be used within a CI/CD job to verify whether data quality checks have been set (a test to ensure (data quality) tests have been set.)
Using dbt-checkpoint to Verify DQ Checks Have Been Set
I won’t digress into the details of Data Quality dimensions, but dbt’s testing features that are shipped ‘out of the box’ can be used for many of the key dimensions of data quality, for example:
- Data Uniqueness, using dbt’s
uniquetest. - Data Completeness, using
not nulltest. - Data Validity, using
accepted valuetest. - Data Timeliness, using dbt ‘freshness’ checks.
- Data Relevance, using dbt’s ‘singular tests’ to implement business rules.
As such, dbt-checkpoint can be used to ensure the dbt DQ tests have been set.
Candidate 4: data-diff
data-diff for dbt can be used to compare row counts between two tables, where you'd typically do this by comparing an original table version against a version containing your proposed table revision. To do this, you need to specify the 'development' database (and schema) that's to be used to store your proposed table changes.
For a good overview of using data-diff with dbt, see Automate dbt development testing in Snowflake with data-diff | datafold.com
5. Summary
There’s a lot of information listed above, but in summary:
- If you want to use CI/CD against your dbt Core project, I recommend that you first replicate dbt Cloud’s ‘Slim CI’ pattern.
- The above instructions provide a breakdown of the steps required to create this ‘Slim CI’ pattern.
- Only once you’ve created this ‘Slim CI’ job should you investigate further dbt CI/CD checks.
6. Useful Resources
Listed below are several pertinent articles that’ll put you in good stead when developing CI/CD jobs for dbt Core.